Thursday, August 25, 2011

CHICKEN AND CHIPS

Have you ever wondered what to do with the handful of broken potato chips that are in the bottom of the bag?  You don't want to throw them out - you love them - But, you really can't eat them ... they are just too small.

How about making chicken strips coated with them?  You already love the flavor of chips so let's pair them with a chicken breast cut into strips and quick fry them in a small amount of butter.  No extra seasoning is necessary.


Delicious!


INGREDIENTS:

- One chicken breast cut in half (like butterfly wings) and then cut into finger like strips.
- The remains of your favorite bag of chips (if the pieces are too big, crush them while they are still in the bag.
- Vegetable oil

DIRECTIONS:

- Put about a Tbsp. of oil in your heavy skillet to heat.

- After cutting up the chicken breast, wash it and dry it with paper towels.

- Drop the pieces of chicken in the potato chip bag, close the top of the bag and shake the chicken (remember Shake n Bake?) to coat the pieces.  (Be sure to throw the bag away after using it - even if all the pieces are not used up.  This is a one time use thing.)

- Remove the chicken from the bag one piece at a time and put them in the hot, oiled skillet.

- Cook over a medium/high heat until golden brown.

While the chicken is browning, fix your favorite side dish and a salad.  Your meal is ready to enjoy.

Experiment with different flavors of chips.  You'll be surprised at how different the chicken tastes.

Enjoy!

Here is my photo of the day from Redgage ...
http://www.redgage.com/c-mggnb

Monday, August 8, 2011

SWEET POTATO MUFFINS

These are delicious when eaten with a meal that is a little spicy, because they are slightly sweet.   

The original recipe called for the dough to be fried in a heavy skillet, but I prefer to bake them.  Either way they are a nice addition to a meal.

UTENSILS:

You will need :
2 large and 1 small bowl 
a sturdy mixing spoon.
an oiled muffin pan ... this should make about 12 muffins.

INGREDIENTS:

3/4 lb. of cooked, drained and cooled sweet potatoes
3/4 Tbsp. active dry yeast
2 Tbsp. lukewarm water
1 3/4 cup all-purpose flour
1 - 2 tsp. salt
1/3 cup room-temperature water
1 Tbsp. vegetable oil

DIRECTIONS:  
  
In a large mixing bowl, mash the sweet potatoes (a few lumps are okay)

In the small mixing bowl, dissolve the yeast in the lukewarm water and let sit for about 5 minutes.  It's ready to be used when the water looks foamy.

Stir the yeast/water mixture into the potatoes until combined.

Add the rest of the ingredients (flour, salt, water, oil) and mix well - until it becomes a soft, sticky dough.  (You may need to add more water if it's too dry or more flour if it's too wet.)

Oil the second mixing bowl and transfer the dough into it. 

Cover the bowl with a towel and let it rest for about 30 minutes - or until it doubles in size.

Now flour a work surface and pour the dough on it.  Knead the dough, adding flour as needed to keep it from sticking, until the dough is smooth.  Be careful not to add too much flour as the dough should remain as moist as possible.

Cut the flour into 12 pieces, gently shape each piece in a ball and "plop" it into the greased muffin pan. 

Cover the pan with the towel and let rise for 30 to 45 minutes. 

Just before putting them in the oven, I sprayed the tops with canola oil and then sprinkled then with a little garlic powder  ... but this is optional.

Bake at 350˚ for approximately 12 minutes.  Check with a toothpick.  If the toothpick is just slightly moist and they are springy to the touch - they're done.  (I hardly ever preheat an oven, you can if you wish.)


Let the muffins cool in the pan for about 5 minutes.  This is so they don't pull apart when you remove them.  

Now take them out of the pan (I just turn the pan over and let them fall on a baking towel.) and place them on a baking rack to finish cooling. 

Another 10 minutes of cooling and they're ready to eat.

Enjoy!

Here is my picture of the day I posted on Redgage - 
http://www.redgage.com/c-meghbb


Thursday, August 4, 2011

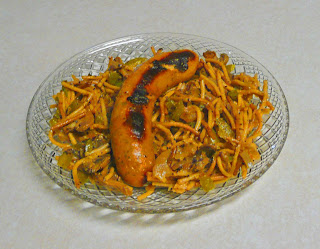
Mushroom and Bell Pepper Spaghetti "Risotto"

This is adapted from a recipe I found in Rachael Ray's "Look+Cook" cookbook.  I love this book because it has pictures!  I like to know what the dish is "supposed" to look like.  Left on my own the "presentation" is awful.  Luckily, my husband doesn't care how it looks, just how it tastes.  However, since I have been working on making food look as good as it tastes, he now makes comments like - "You get a 7 on presentation and a 10 on taste" - then he laughs.

INGREDIENTS (serving 2):

1 -2 Tbsp. Extra Virgin Olive Oil (EVOO per Rachael)

1 Onion (white or Spanish, not a sweet onion like Vidalia)

2 cloves Garlic (chopped very small) (preferably fresh, but definitely not powder or the salt variety)

Pepper and Salt (lots of pepper, minimal salt)

A good handful of Mushrooms (I only had the plain white, but you can use whatever you have on hand)

Beef stock (I used about 1/2 of a can)

Spaghetti, broken into small pieces (I broke the long pieces into quarters, but smaller would work too.)  (You will need to determine the amount needed for 2 people.)

1/2 Cup Beer (I buy it in bottles instead of cans.  It's easier to recap and save what isn't used.  Or you could just drink the leftover!)

1 cup of sliced Bell Pepper (red, green, yellow, orange - whatever kind you have - just slice them small (nearly julienned)

Parmesan Cheese  (optional)

2 Cups of Lettuce (Rachael used Arugula.  I didn't have that in the house, so I used what I had - a mixture of green and red lettuces.)

DIRECTIONS:

In a large, heavy pan (like cast iron) heat the oil over a medium to medium to high heat.

Add the onions and mushrooms.  Sauté until tender - not browned.  This should take about 3 to 4 minutes.

Add the uncooked pasta to the onion mushroom mixture.  Toast until slightly browned.  This will take about 5 minutes, depending on how hot your pan is and how much you turn the pasta.  Kitchen tongs will make the turning much easier.
  
Now add the sliced bell pepper and chopped garlic - combining with the browning pasta, onion and mushroom mixture.

Continue turning the mixture until the pasta is a deep brown (or until you're afraid you will burn it) and the peppers are cooked.

Turn the heat down a little and add the beer.  The pasta will now start to cook, giving off a terrific aroma.  

When the beer has cooked down some, add a little of the beef broth.  Let the liquid almost totally evaporate before adding more of the broth.  Then keep adding the liquid a little at a time until the pasta is cooked but there is still some liquid left in the pan.

Drop the lettuce on top of the pasta mixture and put the cover on so the lettuce will soften.  This should only take about a minute.

Take the cover off the pan and combine the lettuce into the pasta mixture.  

Sprinkle with a little salt and (at least for my family) a lot of pepper on the mixture and combine well.  

At this point I cover the pan and move it off the heat to rest for a moment so the flavors will be blended.

In another pan, I warm/brown up some sausages to serve with the pasta.  By the time thesausages are done, the pasta is ready to serve.

Now, just use the same tongs you turned the pasta with to put the pasta and a sausage (or two) on the plate.  Sprinkle the cheese over the top.


Dinner is served (and there are very few dishes to wash.)!


My flower for the day can be found on Redgage by clicking on the link. 

http://www.redgage.com/c-mdbof

Monday, July 4, 2011

Easy as Pie – for the 4th of July!

It’s the 4th of July and in the South it’s HOT!  I didn’t even want to turn on the small toaster oven and bake ... so to the Internet I went …. discovering (and then changing) this delightful recipe I found on the Betty Crocker website.

INGREDIENTS:

1 Cup              Water
¾ Cup             Granulated Sugar
2 ½ Tble.         Corn Starch
1 Package        Raspberry-flavored Sugar-Free Gelatin
3 Cups             Wild Blackberries (use whatever you have – if frozen, defrost)
1                      pre-made Graham Cracker Crust
Whipped Cream or Ice Cream for topping (always optional ...)

DIRECTIONS: 
       
-  Mix together the water, sugar and cornstarch in a large saucepan. 
-  Heat just to boiling over medium heat, stirring constantly.
-  Boil and stir for 1 minute.
-  Stir in the gelatin until totally dissolved.
-  Cool slightly and stir in the berries (including the juice) gently so that the gelatin/cornstarch mixture coats all the berries, but the berries are not smashed.
-  Refrigerate until set
-  Serve with your favorite topping (ice cream, in my family)


ENJOY!!

Here is my flower for the day ..... Thank you RedGage!

http://www.redgage.com/c-lhdeib

Tuesday, June 21, 2011

PEACH TEA TART

I’m not a big fan of plain tea and I really don’t like sweet tea, BUT since manufacturers have come out with instant peach tea – well, it’s different and I like it.  So when I was thumbing through the May 2011 issue of Southern Living (while waiting in a doctor’s office) and saw a recipe for Sweet Tea Icebox Tart a light went off in my head.  After I arrived home, I downloaded the SL recipe and promptly made changes to it – ‘cause that’s what I do (my poor family)!

INGREDIENTS:

2 tsp                 instant peach tea mix (that’s about one of those little packets)
2 Tbsp             water
14 oz               sweetened condensed milk (this is one can)
1/3 Cup           orange juice
1/4 Cup           lemon juice
2                      large eggs – lightly beaten
1                      pre-made graham cracker crust

Whipped cream and peach slices for topping – both optional.


DIRECTIONS:         

-     In a large bowl mix together the water and instant peach tea mix – mix until dissolved.
-     Whisk in the sweetened condensed milk, the orange juice and the lemon juice.
-     Pour the lightly beaten eggs into the liquid and combine thoroughly.
-     Pour the mixture into the pre-made graham cracker crust.
-     Bake at 350° oven for 25 to 30 minutes or until the filing is just set.
-     Cool completely on a wire rack.
-     Cover and chill in the refrigerator for at least 4 hours.

I suggest serving with some whipped cream and perhaps a piece or two of sliced peach.


Note:    I don’t like my tea strong, so I decreased the amount of instant tea mix from what the original recipe called for.  If you like a strong tea, feel free to use more of the instant tea mix - up to 2 Tbsp.

http://www.redgage.com/rene

Here is my flower for the day - Thank you RedGage!

http://www.redgage.com/c-lecgbf

Wednesday, June 15, 2011

APPLE TARTS

I love this because it’s relatively quick to prepare, pretty inexpensive and does not take a long time to cook … so the kitchen doesn’t heat up too much. 

I use my toaster oven (I have a large one).  It doesn’t use as much power, heats up and cools down quickly.

INGREDIENTS:         
      1                            Pre-made refrigerated pie crust
      2                            Medium apples (your favorite)
      1 Tbsp                   Lemon juice (fresh, if you have it)
      ¼ Cup                    Brown sugar
      1 tsp                       Cinnamon
      ¼ tsp                      Ground Ginger
      1/8 tsp                    Nutmeg
      2 tsp                       Cornstarch

      1 Tbsp                   Sugar (Turbinato, if you have it) for the topping
     
      Spray Cooking Oil
      A little water

DIRECTIONS:
-     Line the pan you be using with aluminum foil and spray lightly with your cooking spray. (You don’t have to line it, but it does make cleaning the baking pan much easier.)
-     Take the pie crust from the refrigerator and let it come to room temperature.
-     Peel, core and dice the apples into small pieces. 
-     Place the diced apples in a saucepan with all the other sugar except the sugar that will be used for the filling and combine well.
-     Cook over medium heat until the apples have released their juice and the mixture starts to thicken.
-     Take it off the heat and taste (carefully – remember it’s very hot).  Add more sugar and spice if needed and let it cool.  (If it’s too thick, you can add a little water.)
-     Take the crust from the package – unrolling it and gently flattening the edges.
-     Carefully fold the crust in half, lightly pressing on the folded edge to make a mark.
-     Open the crust and cut down the mark the folding left.  You now have 2 pieces.
-     Now fold each of the halves and mark as you did the whole crust.
-     Open each of the halves and cut on the mark.  You now have 4 equal size pieces.
-     Spoon about 2 Tbsp of the apple mixture in the center of each piece of dough.
                        Note:    I only fill one piece of dough at a time, keeping the other pieces covered with a cloth or paper towel, so they don’t dry out.  Don’t worry if you have filling left over, as there is a simple use for it.
-     Slightly wet the edge of one of the pieces of dough (so they will stick to each other) and pinch the edges together to seal.  Do this to each of the 4 tarts.  The shape of the tart isn’t important, so don’t worry if you think they aren’t perfect.
-     Lightly spray the tops of the tarts with your cooking spray and sprinkle the white sugar (or Turbinato Sugar) on top.
                        Note:    I finally splurged and bought Turbinato Sugar because it stays crunchy –  not dissolving when baked.  My store offered it in a 1 lb. package making it affordable.  After opening, I put it in a re-purposed spaghetti sauce jar.  It lasts a long time because so little is used at any one time.
-     Bake at 425° for 10 minutes.  Check the tarts.  If not brown enough or if you don’t see the filling bubbling, lower the temp to 350° and continue cooking for another 3 to 4 minutes.
-     You can serve them warm or after they’ve cooled – your choice.


Any unused filling is simply made into a topping for ice cream by adding a little more water, returning it to the heat and cooking until the apples are soft and the mixture has cooked to a medium consistency.

Good Cooking!!

http://www.redgage.com/rene

Thank you, Redgage!


Thursday, June 9, 2011

RICE PIE

I found this recipe a couple of years ago in a cook book called "Sweety Pies" by Pattie Pinner ... and then made some changes to it.  Doesn't every cook make changes??

I suspect it originated in the South where rice was a staple.  It was probably handed down by word of mouth until someone who knew how to write put it on a scrap of paper so it wouldn't be forgotten.

It's an easy custard type pie that turns out well even if you change the amount of rice.

INGREDIENTS:
1                                 Pie crust for a 9” single crust pie
3                                 Large eggs
1 Cup                         White sugar
1 ¾ Cups                  Ricotta cheese (I suspect cottage cheese was originally used)
2 tsp.                         Lemon juice (or white vinegar)
2 Tbsp.                      Lemon rind (optional)
2 Cups                       Heavy cream
1 Cup                         White rice – cooked
½ tsp.                        Ground Cinnamon
¼ tsp.                        Allspice

DIRECTIONS:

Preheat oven to 350°.  Prepare the pie crust and set aside.  (I prefer to use a deep dish style pan.)

-           Crack the eggs into a large bowl and beat until well blended.  Now add in the sugar and beat until it's blended in.
-           Stir in the ricotta, lemon juice and rind until thoroughly incorporated.
-           Add the cream a little at a time until smooth.  Fold in the rice.
-           Stir in the cinnamon and allspice.
-           Pour the filling into the pie crust.
-           Place in the oven and bake until a toothpick inserted in the center comes out clean and the top   is    nicely browned (45 to 60 minutes).
-           Let cool completely on a wire rack before serving.

I like to chill this pie before serving as it cuts a little cleaner.

Good Eating to all especially my friends on Redgage!!